Saturday, January 19, 2013

Hunt Report: 2013 CO Mt Lion - Beginner's Luck

Hi there.

A new friend offered to let me tag along on a Mt Lion hunt today.  Conditions weren't great for finding a fresh track but it is kind of like fishing, you have to have a line in the water if you are going to have a chance.

We drove up some mountain roads as the sun was rising, looking for tracks from the road.  Our first road revealed nothing of any interest, so we went to another one.  On the second road, we stopped almost as soon as we started and I was told something like "the pain starts here".  We were essentially parked at the bottom of a canyon and it was steep every direction I looked.  Those of you that know me, know I don't do much in the way of exercise unless I'm packing a rifle, and October was the last time I packed a rifle any distance.  I thought hunting season was over and the winter layer is pretty thick.  I was pretty winded trying to keep up with a young whippersnapper and a pack of dogs but I made it to the top of the ridge and eventually caught my breath.

We climbed the ridge a ways and stumbled into some tracks that looked a couple days old.  It had been about 2 weeks since it snowed at this point and things had been melting fast the last couple days.  The dogs showed some interest and we found some skat that wasn't that old either.  We had found some chunks of deer hide and leg bones just down the ridge too.  Lion country!  We had the tracks going in both directions but two of the dogs were real interested in following one set.  It wasn't more than a couple minutes and we could hear them getting excited.   We could hear them howling and the gps tracking collars showed them pretty stationary which was a good sign.

After sliding down a pretty steep slope several times, we finally caught up with the dogs and sure enough, they were trying to climb a tree.  And, there was a cat standing on a branch mid way up the tree.

Walking up on the treed Mt Lion.


It was obvious that it wasn't a big cat, which pretty much means it is a female.  When we got to the base of the tree and could get a good look at her, we noticed that it looked like she was nursing kittens which is a deal breaker on shooting the females which are legal in Colorado.   This one got to live.  Catch and release.

The dark spots on her belly were indications that she had feeding kittens.


I had never seen a mountain lion before, let alone stand 15 ft below one.  That was cool, but the coolest part was watching the dogs and how excited they were to be doing their job.  They have an amazing desire to get those cats and would climb right up there and tie into them if they could.  The little guys must never look in the mirror...
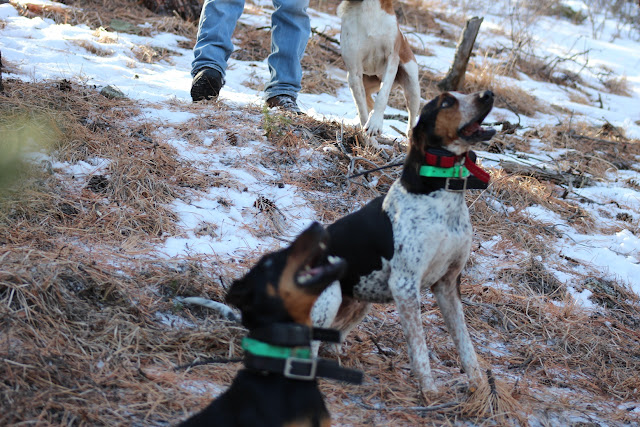
A rare picture of our helpers with most of their feet on the ground.
One last photo before calling the dogs off.


Monday, January 7, 2013

Build #12 & #15 - His and Hers .300 Win Mag Custom Rifles


Sawtooth Rifles - Build #12&15:  .300 Win Mag, His and Hers!

A custom pair of mid weight hunting rifles with long range capability.

Spec's:

Sawtooth Rifles #12 "Netto"
Action:  Stiller Precision Firearms - Tactical 300
Barrel Blank:  Brux #3, Stainless, 4 groove, 1:10" twist, finished at 25"
Chamber:  .300 Win Mag
Stock:  Grey Laminate, Epoxy bedded with aluminum pillars.
Bottom Metal:  Rem BDL Aluminum
Trigger:  Timney, set at 3 lbs.
Rings/Bases:  Stiller 0 MOA rail and TPS Alloy rings, 30mm, lows.
Optic:  TBD
Finish, Metal:  Sniper Grey Cerakote
Stock LOP adjusted to 12.75" and Pachmayr Decelerator installed.


Sawtooth Rifles #15 "Brento"
Action:  Stiller Precision Firearms - Tactical 300
Barrel Blank:  Brux #3, Stainless, 4 groove, 1:10" twist, finished at 26"
Chamber:  .300 Win Mag
Stock:  Bell and Carlson Medalist with full length aluminum bedding block
Bottom Metal:  Rem BDL Aluminum
Trigger:  Timney, set at 3 lbs.
Rings/Bases:  Stiller 0 MOA rail and TPS Alloy rings, 30mm, lows.
Optic:  TBD
Finish, Metal:  Patriot Brown Cerakote
Finish, Stock:  Cerakote with Flat Dark Earth base coat and Patriot Brown, OD Green, and Armor Black camouflage


#15, in a pile of parts

Barrel blank chucked up in the lathe, ready to start the process of fitting it to the receiver and cutting the chamber.

With the barrel tenon features machined to mate with the receiver, it is time to cut the chamber with the chamber reamer.
Chamber time.

With the barrels screwed into the receivers, we could then do some fitting work on the stocks and get them marked for engraving with our proprietary method of getting the spelling right.

Hand cut engraving by Lewis Severn.


The barrels take one last trip to the lathe for the crowns.  We cut a recessed 90* crown on these.


With the machine work finished up on the barrels, they could be put in the barrel vise and torqued onto the receivers.

Final torquing of the receiver onto the barrel.


It is getting time to start turning these into rifles.  Here, the stock for #12 has been covered with painters tape everywhere except where the epoxy bedding will be, and the epoxy is laid in.

The aluminum pillars are held onto the receiver with some action screws, and epoxy is added to the crucial areas to try to eliminate air voids in the final bedding job.

The two halves are placed together and held with the "rubber bands" while the epoxy cures.  Playdough is used to keep epoxy from working its way into places where we don't want it.  Also, at this time we really hope we remembered to apply a release agent to the metal so it can be separated from the stock...

Well, the release agent did its job and they came apart revealing a perfect mold of the receiver on the stock.  Some clean up and trimming will take place now.

Cerakote time.  The small parts are all in one oven, #12 in Sniper Grey on the left, and #15 in Patriot Brown on the right.
The cerakoted barreled receivers bake in the other oven.


A length of pull adjustment is made to the stock for #12.

A new Pachmayr Decelerator recoil pad is selected for the stock.

The recoil pad is ground to fit.


Meanwhile, over at the Cerakote division, the stock for #15 has had its base coat applied and flash cured and the mesh wrap has been put on for the "Sawtoothaflage".


The finished parts of #12 laid out for final assembly.

And a few minutes later, #12 is a rifle.

After the camo cures on the stock for #15, it is laid out for assembly.

And #15 comes to life!

Partners in crime.

Test day!  #12 at the range.
#15 getting a work out.  Actually my shoulder is what got the work out.

 Range Report:

We shot these rifles with a few different factory rounds and some handloads that were developed for the #4 build.  We were more than happy with the results from the factory ammo, which will be the main diet for these rifles.  Federal Premium's 180 gr Nosler Accubond load shot under 1/2 MOA on our first test (under some numb finger conditions even).  We will be doing a little more testing with these rifles and then will get them set up with proper hunting scopes.


Keywords:  SR#12, SR#15

Build #10 & 11: .308 Win F-t/r competition barrels for a BAT action


Sawtooth Rifles - Build #10 & 11:  .308 Win F-t/r competition barrels for a BAT action

A set of barrels for a F-t/r competition rifle based on a BAT-B action.


Spec's:

Sawtooth Rifles #10
Action:  BAT model B target action
Barrel Blank:  Krieger #14 Heavy Palma, Stainless, 4 groove, 1:12" twist, finished at 29.5"
Chamber:  .308 Win Darn Palma Rev B
Finish, Barrel:  Cerakoted in Blue Titanium and Tungsten


Sawtooth Rifles #11
Action:  BAT model B target action
Barrel Blank:  Krieger #14 Heavy Palma, Stainless, 4 groove, 1:11" twist, finished at 29.5"
Chamber:  .308 Win Darn Palma Rev B
Finish, Barrel:  Cerakoted in Blue Titanium and Armor Black

For this project, an already chambered barrel was supplied as the model for the desired chamber depth and length (barrel weight).  The goal was to simply duplicate this, and gain the ability to supply future barrels for this receiver without needing the receiver to fit each one.  The supplied barrel was chambered by a fellow by the name of Lester Bruno... There was just a little bit of pressure on us for these barrels to perform.

I should also say that this particular project was pursued as a way to see where we are at as a rifle shop, as they will be evaluated by one of the top F-t/r shooters.  I am very thankful to have the chance to do this, and have a friend have enough confidence in me to send me $700 worth of Kriegers and say have at it.  We do have some pretty high expectations for these barrels now.

The BAT action is a masterpiece in itself.


A new tool we made during this project that allows a positive measurement of the chamber depth, by measuring the distance from the tenon shoulder to go gauge face.  This measurement can be compared to the distance between the receiver face (or recoil lug face if one is used) and the bolt face, and the difference is the headspace allowance.  In theory...
Our headspace measurement on the Bruno barrel = 1.0725ish.
A squared off face of the barrel blank, ready for the tenon features to be machined.

Tenon features to mate up with the BAT action.

Testing the fit of the BAT action on barrel #10.  Perfect.

With the chamber mostly cut, we use the new chamber depth tool to measure where we are at and calculate how much further we need to go.

1.0725ish.

Rifle math and expensive little tools.

Another little trick is to crush a piece of silver solder between the go-gauge and bolt face, which gives you something you can measure the thickness of.

0.003"
Just hit the go button again and we have #11.  Actually it takes a bit more than that...

#10 and #11, just a few more things to do.

Crown time.  We used a recessed 90* target crown on these.  It is simple geometry but perfection is our goal here.

The shine was taken off the barrels and then they were marked for engraving.
Lewis put the magic touch on them.

With the ends of the barrels polished and masked off, we decided to play around with a little Cerakote on them.  A base coat of Blue Titanium was applied and flash cured.  Some netting was applied and a second color was added.

Done.

Crowns on the small ends.

Tenon ends

One of each.


The complete rifle with Barrel #11 on the firing line.
Keywords:  SR#10, SR#11